
Best No Roll Gluten-Free Pie Crust Recipe (Easy & Fast)
When our family received our celiac diagnosis, it wasn’t bread that we all cried about. It was pie. Delicious fruit pie, chicken pot pie, quiche, and all the tasty dishes that require pie crusts. What’s Thanksgiving without pumpkin pie or Independence Day without Grandma’s cream pie? Fortunately, the goal with most pie crusts is to avoid activating the gluten in the flour so the crust remains buttery and flaky. After many tries, we have landed on this simple no-roll gluten-free pie crust that we use for just about everything that needs a pie crust. This quickly comes together, doesn’t require xanthan gum, and freezes well for future use. This recipe will make dough for single-crust pies, but I highly encourage you to make more than one pie crust at a time and freeze the crust for later. I will share two methods for preparing and storing your pie crust for future use below.
Best Flour for Gluten-Free Pie Crust
You’re probably wondering where you should start when making a gluten-free pie crust, and I will be the first to tell you it’s all about flour. The four you choose for your crust will dictate the quality of your crust, the crumble, and the flake factor. This recipe will produce a delicious flaky pie crust that doesn’t require a rolling pin or chilling time.
You can use a gluten-free all-purpose flour blend that includes all of the necessary ingredients, like the one from King Arthur Flour or from Bob’s Redmill.
For this recipe, I used the following flour blend:
2 Cups white rice flour
1 Tablespoon of psyllium husk powder
1/4 cup tapioca flour (also called tapioca starch)
Important Note:
You may choose to use substitute another kind of flour in place of those listed in the flour blend recipe above. However, you may end up with different results. Flours to not use in your gluten-free flour blend include almond flour, coconut flour, and cassava flour, as they are heavier flours and will not bind well or form a sturdy crust.
Gluten-Free No Roll Pie Crust Ingredients
2 cups gluten-free flour blend (use the one above or a pre-mixed variety)
1/2 cup of unsalted butter (1 stick of butter)
1 teaspoon of salt
3-8 tablespoons of ice water
Tools
Some of the items linked are affiliate links. I receive a small commission when you purchase through my link at no additional cost to you.
Gluten-Free Pie Crust Method

Two things have changed how I make a homemade gluten-free pie crust that I will never change. One is using a food processor. Yes, you can use a large bowl and a pastry cutter to get the job done, but it’s tiring, and with gluten-free dough, one of the tricks is to never over-mix, which is a lot easier to do with a bowl and a spoon. The second life-changing method is grating the butter. I know it sounds crazy. Grating the butter not only has eliminated my need to use forks to cut the butter into pie dough, but it also allows for even distribution of the butter into the baked good, which is especially important for pie crust. Grating the butter makes it simple to make an easy gluten-free pie crust with far less hassle.
The best thing to start the process with is grating your butter. You can grate the butter over a cutting board or directly into the food processor bowl. Either way, grate the butter as best you can. It’s okay if pieces of butter and large chunks remain.
A tip for grating butter: Freeze your butter and grate it. When frozen, the butter won’t just slide and mush all over the grater.
Tip for working with gluten-free flour: Measure your gluten-free flour by spooning it into your measuring cup. This will allow the flour to remain airy and light. If you scoop the flour too much at a time, this will compact the flour and result in a dense crust. Sift the flour into the food processor bowl or spoon it from the measuring cup into the food processor, too, again, to avoid compacting the flour.
Once the butter is grated and in the bowl of the food processor, measure out your gluten-free flour mixture and sift it into the food processor basin over the butter. Add the salt, too, at this point.

Next, and this part is important, ensure you’re using ice-cold water to make your gluten-free pie dough. The cold water will help keep the butter from melting and allow your pie dough to hold together.
Pulse the dough in the food processor a few times to allow the dough to come together. Once your dough begins to clump together, it’s ready to use. If your dough resembles grits or sand, add one more teaspoon of cold water and continue to blend. Add a teaspoon of water until you reach the right consistency for your pie crust.

Transferring the Dough to a 9-inch Pie Pan
I prefer using a glass 9-inch pie plate, especially if I am going to bake my pie immediately. For freezing, I prefer to use aluminum pie tins.
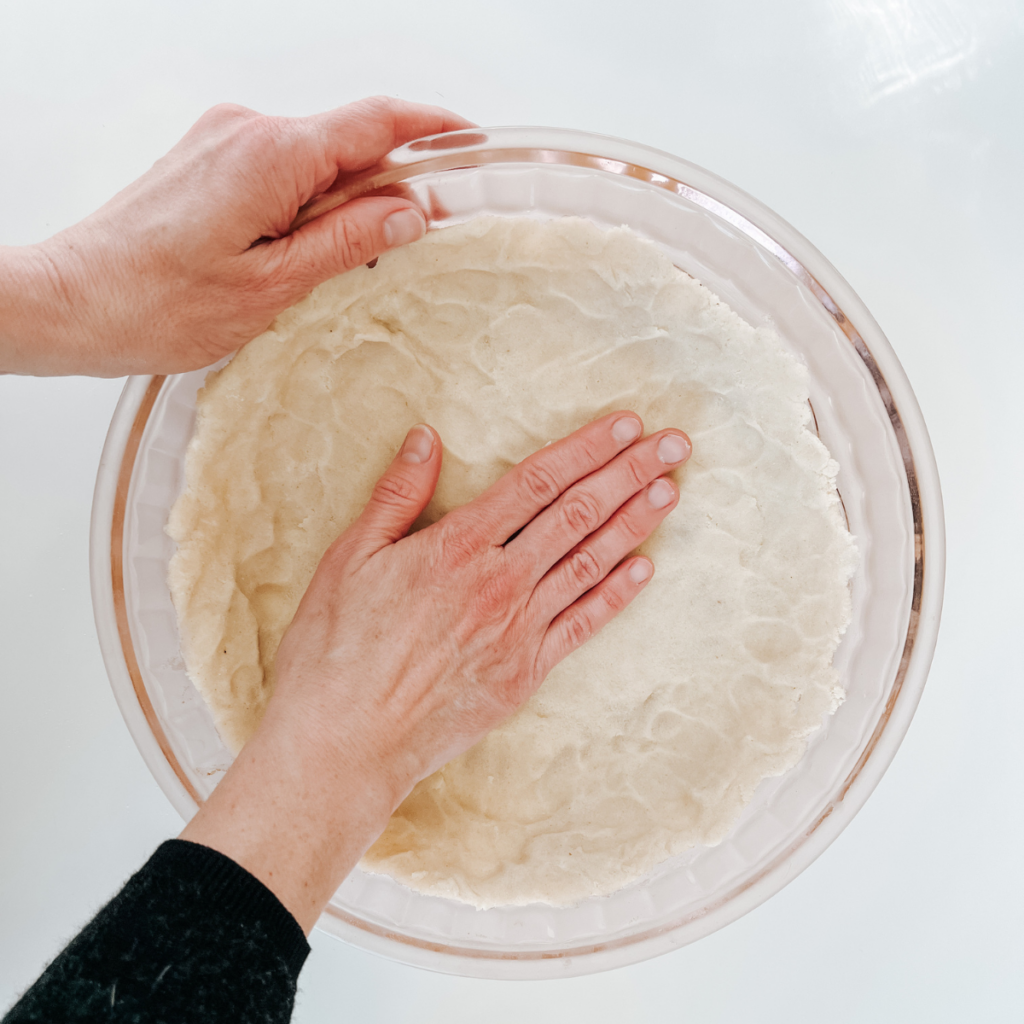
Once your dough is ready, remove it from the food processor and put it into the center of a 9-inch pie pan. Begin to work the dough with the heels of your palms to cover the bottom of the pan with the dough. Work the dough up along the sides until the pan is coated in the dough.
Any remaining or excess dough can be worked along the edges of the pie pan into a rim for the crust.
Blind baking or Pre-Baking the Pie Crust
It’s a good idea to blind bake your pie crusts, especially if you’re filling them with moist fillings like custards or pot pie fillings.
First, prick a few holes into the base of your pie crust with a fork. This will eliminate bubbles and keep your pie crust even. Fill the bottom of your crust with pie weights or dried beans, or cover the crust with parchment paper or aluminum foil.
Preheat your oven to 400°F and place your crust into the oven for about 10-15 minutes. Keep an eye on the crust to ensure it doesn’t become over-baked. Remove the parchment paper or aluminum foil partway through the blink bake to allow the crust to brown lightly.
After baking, remove the crust from the oven and allow it to cool. If you’re going to fill the crust immediately, it’s okay for the crust to remain a little warm before filling. If you want to freeze your crust for later, allow it to cool completely before it becomes strong. More details on how to freeze your crust are below.
Once your pie crust is at room temperature, you are now ready to fill your pie crust!
Dairy-Free Alternatives
Sometimes you don’t have butter or need a vegan pie crust. You can substitute almost any type of vegan butter in place of butter. Even coconut oil or coconut butter works well. You do not need to grate the vegan or coconut butter before adding it to the food processor. You will still want to use cold butter, whether it’s vegan or not.
Storing and Freezing Your Flaky Gluten-Free Pie Crust
1. Raw & Unformed
After processing your dough in the food processor, pause at that step and freeze your dough for later use. Form your dough into a flattened oval dough ball and wrap it tightly in plastic wrap. Add a layer of aluminum foil and place your wrapped dough into a freezer bag. Your bag will hold several dough balls. Label and date your freezer bag and store in the freezer for up to one year.
When ready to use your dough, remove a single dough ball from the bag and all thaw at room temperature. Or allow it to thaw in the fridge for 3-5 days before setting it to thaw at room temperature. Your dough needs to be fully thawed before use.
2. Raw & Formed
This is my favorite way to store pre-made dough. After processing your dough, place the dough ball into the center of a pie tin (aluminum pie tins work great for freezing) and work the dough until it has covered the bottom and sides of the pie tin. Wrap the pie tin in plastic wrap and place it inside a freezer ziplock bag.
To use your pre-formed pie crust, remove it from the freezer and allow it to thaw in the fridge for 3-5 days. Before filling, remove the crust from the fridge and allow it to come to room temperature. Blind bake the crust as instructed above.
3. Pre-Baked & Frozen
After blind baking your crust, allow it to come to room temperature. Then, wrap the crust in plastic wrap and aluminum foil and place it inside a freezer plastic bag. Label and date your pie crust and place it into the freezer. Your pie crust will keep for up to one month. You can store it longer, but the freezer’s cold may dry out the crust and cause it to break when it thaws.
When ready to use your pre-baked crust, remove it from the freezer and let it come to room temperature before filling. I do not recommend leaving the crust to thaw in the fridge as the crust can get soggy or too dry and fall apart. This method is great if you know you’ll need the crusts in a short period of time, like for Thanksgiving or Christmas, and you want to get ahead of some of the meal prep.
There are so many ways to use this gluten-free pie crust. We have loved using this recipe to make apple pies in autumn, pumpkin pies in winter, and quiches- like our favorite dill quiche recipe in the spring. We would love to hear how you fill your crust. Please let us know in the comments.
GLUTEN-FREE NO ROLL PIE CRUST

Make this easy no-roll pie crust recipe for all of your quiches, fruit pies, and pot pies. Make the crust ahead of time and freeze it for future use. Being gluten-free just got easier.
Ingredients
- Gluten-Free Flour Blend:
- 2 Cups white rice flour
- 1 Tablespoon of psyllium husk powder
- 1/4 cup tapioca flour (also called tapioca starch)
- To Make the Pie Crust:
- 2 cups gluten-free flour blend (use the one above or a pre-mixed variety)
- 1/2 cup of unsalted butter (1 stick of butter)
- 1 teaspoon of salt
- 3-8 tablespoons of ice water
Instructions
- Grate the butter into the food processor bowl.
- Measure out the flour and sift it into the food processor bowl.
- Pour the ice-cold water into the food processor bowl.
- Pulse the dough in the food processor a few times to allow the dough to come together. Once your dough begins to clump together, it's ready to use.
- Begin to work the dough with the heels of your palms to cover the bottom of the pan with the dough. Work the dough up along the sides until the pan is coated in the dough. Any remaining or excess dough can be worked along the edges of the pie pan into a rim for the crust.
- Pre-heat your oven to 400°F and blind-bake the crust for 10-15 minutes until the crust is light golden brown.
- Allow the crust to cool before filling.
Notes
- If your dough resembles grits or sand, add one more teaspoon of cold water and continue to blend. Add a teaspoon of water until you reach the right consistency for your pie crust.
- A tip for grating butter: Freeze your butter and grate it. When frozen, the butter won't just slide and mush over the grater.
- Tip for working with gluten-free flour: Measure your gluten-free flour by spooning it into your measuring cup. This will allow the flour to remain airy and light. If you scoop the flour too much at a time, this will compact the flour and result in a dense crust. Sift the flour into the food processor bowl or spoon it from the measuring cup into the food processor, too, again, to avoid compacting the flour.
- Raw & Unformed: After processing your dough in the food processor, pause at that step and freeze your dough for later use. Form your dough into a flattened oval dough ball and wrap it tightly in plastic wrap. Add a layer of aluminum foil and place your wrapped dough into a freezer bag. Your bag will hold several dough balls. Label and date your freezer bag and store in the freezer for up to one year. When ready to use your dough, remove a single dough ball from the bag and all thaw at room temperature. Or allow it to thaw in the fridge for 3-5 days before setting it to thaw at room temperature. Your dough needs to be fully thawed before use.
- Raw & Formed: This is my favorite way to store pre-made dough. After processing your dough, place the dough ball into the center of a pie tin (aluminum pie tins work great for freezing) and work the dough until it has covered the bottom and sides of the pie tin. Wrap the pie tin in plastic wrap and place it inside a freezer ziplock bag. To use your pre-formed pie crust, remove it from the freezer and allow it to thaw in the fridge for 3-5 days. Before filling, remove the crust from the fridge and allow it to come to room temperature. Blind bake the crust as instructed above.
- Pre-Baked & Frozen: After blind baking your crust, let it come to room temperature. Then, wrap the crust in plastic wrap and aluminum foil and place it inside a freezer plastic bag. Label and date your pie crust and place it into the freezer. Your pie crust will keep for up to one month. You can store it longer, but the freezer's cold may dry out the crust and cause it to break when it thaws. When ready to use your pre-baked crust, remove it from the freezer and let it come to room temperature before filling. I do not recommend leaving the crust to thaw in the fridge as the crust can get soggy or too dry and fall apart. This method is great if you know you'll need the crusts in a short period of time, like for Thanksgiving or Christmas, and you want to get ahead of some of the meal prep.
Nutrition Information:
Yield:
8Serving Size:
1Amount Per Serving: Calories: 435Total Fat: 14gSaturated Fat: 8gTrans Fat: 0gUnsaturated Fat: 5gCholesterol: 31mgSodium: 300mgCarbohydrates: 69gFiber: 3gSugar: 3gProtein: 8g
