
Easy Fermented Preserved Lemons: How to Preserve Lemons with Salt
Fermented preserved lemons were one of the first fermentation projects I ever tried. Our lemon tree had gifted an abundance of fresh Meyer lemons, and the process seemed simple. I am always game for an easy recipe, and one that only included lemons and salt seemed like a no-fail way to try the fermentation process.
The uses for fermented preserved lemons include adding unique flavors to soups, stews, pastas, and salad dressings. They are often used in middle eastern cuisine and north African meals.
(This post contains affiliate links. I make a little money from the purchases made through this link)

What are the health benefits of making fermented lemons?
Besides being a very easy recipe, fermenting lemons has many health benefits. The process also requires a large number of lemons and uses many entire lemons in the process. Fermented lemons are also a great introduction to making and using fermented foods in your daily cooking.
The fermentation process introduces beneficial bacteria that support the digestive tract and the gut. The lemons are also infused with healthy probiotics that provide the body with beneficial bacteria. Probiotics have been shown to benefit immune system function and heart health.
What type of lemon works best for fermenting?
You will want to use the whole lemon when making fermented preserved lemons. Although Meyer lemons result in soft, buttery, and creamy lemons, any regular lemons will work with this process. You are looking for the balance of whole lemons to juice to salt.

What Kind of Salt Should You Use
It’s best to use sea salt for fermentation recipes. Choose a sea salt with no added ingredients or non-caking agents. Avoid salts with chlorine or iodine, as those chemicals may inhibit the growth of good bacteria.
Our favorite sale to use is Redmon’s Real salt. We like to buy a ten-pound bucket at the start of every new year. When stored in a cool, dry place, the salt remains smooth and doesn’t clump. Redmond’s Real Salt also doesn’t contain any extra chemicals or additives. I always know that my fermentation recipes will turn out well when I use this salt.
How to Make Fermented Preserved Lemons with Salt
All you need to make fermented preserved lemons is a large mason jar, salt, and whole fresh lemons. That’s it! In just a few weeks, you will have delicious and tangy fermented lemons to add to salads, savory dishes, and Moroccan and African-inspired meals. Below you will find all the details needed to whip up your first batch of fermented preserved lemons with salt.
Tools Needed:
64oz Mason Jar
Large-Mouth Mason Jar Lid
Wooden Spoon
Cutting Board
Sharp Cutting Knife
Teaspoon
Apron
Ingredients Needed:
Five pounds of fresh Meyer Lemons or any other type of lemon, sliced in quarters but not cut all the way through.
1/2-1 cup of Redmond’s Real Salt
Instructions:
Prepare the Jar & Lemons for Fermented Preserved Lemons
- Wash and dry the large mason jar.
- Pour one tablespoon of salt into the bottom of the jar.
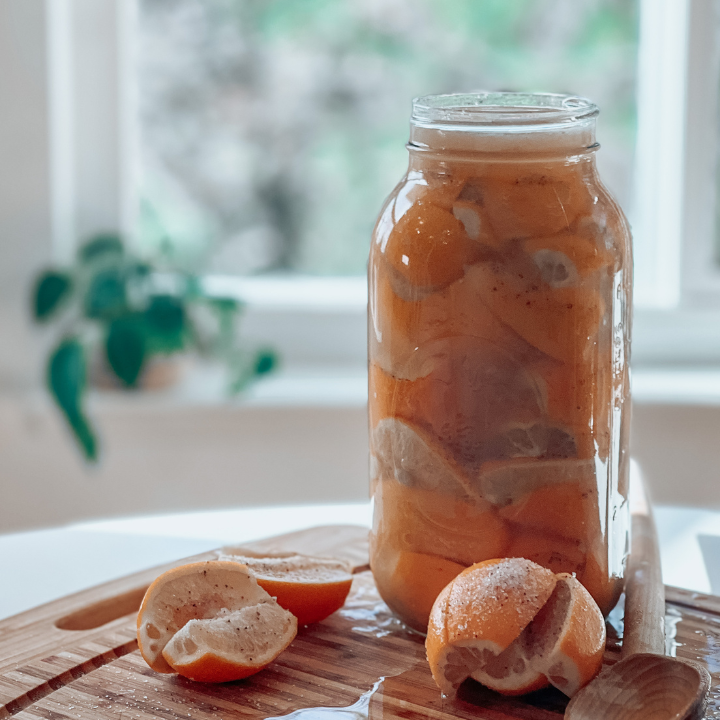
- Wash and dry all of the lemons. Use a sharp knife to slice the lemon 85% in half lengthwise. Rotate the lemon at 90 degrees and slice it in half again. Your lemon should fall open like a flower but remain attached at the base by a few centimeters of the peel.
Preparing & Making the Fermented Lemons
- With the open side of the lemon facing down, press the entire sliced lemon into the jar. The sliced sections will spread out like an upside-down flower.
- Sprinkle salt on top of the lemon inside of the jar. About one tablespoon on top of the lemon.
- Repeat the slicing process with the remaining lemons.
- Continue to press each lemon into the jar, stacking the lemons on top and down onto the sides of each other. Ensure there is very little space between each lemon.
- Continue to add one tablespoon of salt with each additional lemon.
- Before placing the lemon into the jar, apply the salt to each lemon-sliced section for additional protection.
- As you compress the lemons in the jar with the tip of a spoon or your fist, the fresh lemon juice will release from the lemons and begin to fill the jar.
The Fermentation Process
- Continue filling the jar until you cannot fit any more lemons into the jar.
- The liquid must cover all lemons in the jar. If a lemon is not covered, remove it and compress the lemons more with the spoon. If there is space and enough juice to cover the remaining lemons, add them to the jar. Otherwise, discard any lemons that the juice cannot cover in the jar.
- Next, place a large-mouth mason jar lid onto the jar. The lemons will rest in their own juices and salt for several weeks as part of the fermentation process. You can also add a fermentation weight to your jar before securing the lid. A fermentation weight is unnecessary as long as all lemon peels remain below the liquid in the jar.
- Set the jar in a cool, dry, and dark location for eight weeks. You may want to burp the lemons once a week to release excess fermentation gas. The fermentation process may take longer in winter when the room temperature remains cooler.
- After eight weeks, test the lemons. If the peels are soft and melt in your mouth, then the lemons are ready and can be stored in the refrigerator for up to two years.
- If the lemon peel is still hard, allow the lemons to sit for another 1-2 weeks.
How to use your preserved and fermented lemons
There are many great ways to use your preserved lemons. Your lemons will not only have a unique flavor, but the entire lemon will be edible, including the preserved lemon peel. The easiest way to use your preserved lemons is to remove one lemon from the jar and slice it into thin pieces. Sprinkle the pieces onto pasta for an added lemon flavor, or use it as a pizza topping for a delicious tangy flavor.
If your lemons taste too salty, rinse them gently under cold water to remove any excess salt. After the fermenting process, the lemon flesh will be soft and slightly soupy. The peel of the preserved lemon will also be thinner and softer. They will often melt in your mouth, and they will not have the bitter flavor of fresh lemon skins.
Easy Fermented Preserved Lemons With Salt

Fermented preserved lemons were one of the first fermentation projects I ever tried. Our lemon tree had gifted an abundance of fresh Meyer lemons, and the process seemed simple. I am always game for an easy recipe and one that only included two ingredients-lemons and salt-seemed like a no-fail way to try the fermentation process.
Once your fermented lemons are ready, they will keep in the fridge for up to two years. Use them to add a pop of flavor to stews, salads, and pasta, and they make an excellent pizza topping!
Ingredients
- 5 lbs fresh, whole lemons
- 1/2-1 cup of high-quality sea salt
Instructions
- Wash and dry the large mason jar.
- Pour one tablespoon of salt into the bottom of the jar.
- Wash and dry all of the lemons. Use a sharp knife to slice the lemon 85% in half lengthwise. Rotate the lemon at 90 degrees and slice it in half again. Your lemon should fall open like a flower but remain attached at the base by a few centimeters of the peel.
- With the open side of the lemon facing down, press the sliced lemon into the jar. The sliced sections will spread out like an upside-down flower.
- Pour a tablespoon of salt on top of the lemon inside of the jar.
- Repeat the slicing process with the remaining lemons.
- Continue to press each lemon into the jar, stacking the lemons on top and down onto the sides of each other. Ensure there is very little space between each lemon.
- Continue to add one tablespoon of salt with each additional lemon.
- Before placing the lemon into the jar, apply the salt to each lemon-sliced section for additional protection.
- As you compress the lemons in the jar with the tip of a spoon or your fist, the juice will release from the lemons and begin to fill the jar.
- Continue filling the jar until you cannot fit any more lemons into the jar.
- The liquid must cover all lemons in the jar. If a lemon is not covered, remove it and compress the lemons more with the spoon. If there is space and enough juice to cover the remaining lemons, add them to the jar. Otherwise, discard any lemons that the juice cannot cover in the jar.
- Next, place a large-mouth mason jar lid onto the jar.
- Set the jar in a cool, dry, and dark location for eight weeks. You may want to burp the lemons once a week to release excess fermentation gas.
- After eight weeks, test the lemons. If the peels are soft and melt in your mouth, then the lemons are ready and can be stored in the refrigerator for up to two years.
- If the lemon peel is still hard, allow the lemons to sit for another 1-2 weeks.
Recommended Products
As an Amazon Associate and member of other affiliate programs, I earn from qualifying purchases.
